METHODS:
Basic steps to do noise generated procedural geometry.
Part 1. The density function and rendering the volume density texture
Part 2. The marching cubes algorithm and defining blocks of geometry.
Part 1. The density function and rendering the volume density texture
The beauty of this procedure lies in the manner in which random numbers and mathematics are applied. An aspect that has also motivated me to do this is that it was a nice case study to learn about many facets of DirectX and HLSL.
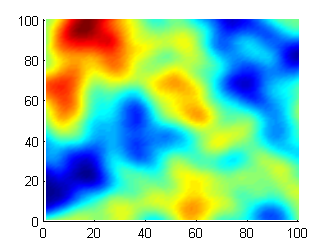
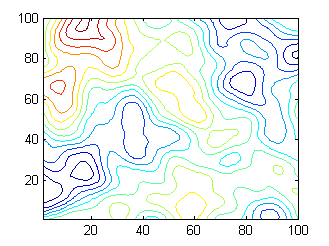
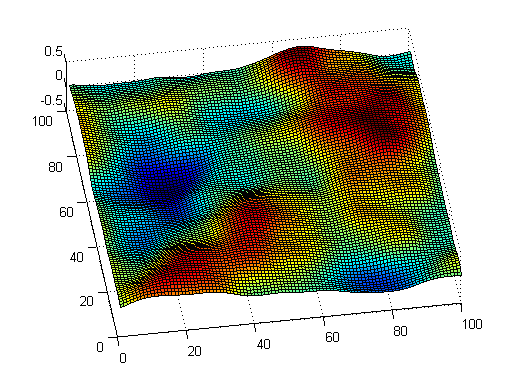
The procedure uses the marching cubes algorithm to produce trianglestrips that form an isosurface. There are lots of webpages devoted to this method so I won't say too much about it. But to apply this technique you need to define a volume of "density" values that contain isosurfaces. To illustrate this, here is a picture in which the colors represent height. So I can make a second figure in which i draw lines in the height map where the values are the same. I suppose you would call these isolines. Isosurfaces define surfaces where the values are identical. The marching cubes algorithm detects zero crossings and forms triangles where zeros define an isosurface.
So you need to have some method to construct a volume with positive and negative values and the border (zero density) between these values should define a surface. To obtain such a volume from noise we use perlin textures.
This starts by making a matrix of random numbers and calculating smooth interpolations between these numbers. This was originally developed by Ken Perlin to make procedural textures without using to much memory. There are several sites explaining how this works, here is one by Matt Zucker.
Perlin noise starts with a series of random numbers of which a texture is made on the graphics card; (This is based on DirectX11 and HLSL shader programming!!) The code below is just copied out of the example software that is included in the directx download package (DirectX SDK 2010). I have compiled the code in Visual C++ 2010 Express (can also be downloaded for free; playing with directx is a very cheap hobby!!!)
Now you can sample from this texture a HLSL shader program.
Texture3D<float> g_txRandVolume : register( t10 );
density = g_txRandVolume.Load(Offsets[i]); //offsets is a uint4 defining a 3d position in the texture
.
Random numbers by themselves are not very nice, but with smooth interpolations... they become perlin noise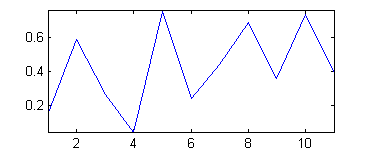
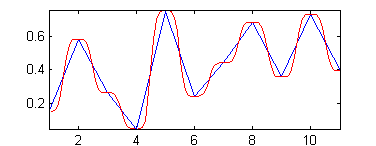
There are other ways to interpolate between values, but the sigmoid function (f(x) = 6*x^5 - 15*x^4 + 10*x^3) used here has additional usefull properties.
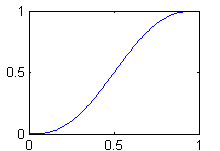
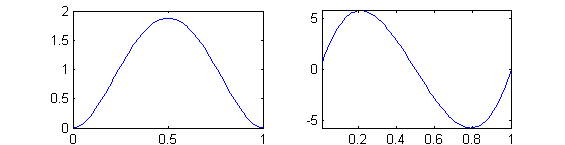
The Sigmoid function has nice smooth first and second derivatives
The first derivative can be used for estimating a normal, but it can also be seen that it's magnitude depends on the distance from bending points and this property can be used for texturing the geometry later on and this is also why the second derivative is usefull. Because a function is used to interpolate, you can readout this function at any level of detail. In other words you can stretch the red line to any length you like, either making the resulting line have very slowly changing values or relatively fast changing values. And you can add different combinations of lines together to get a complex wavy pattern in which consecutive samples differ gradually as in the next figure.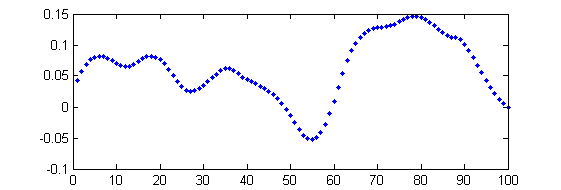
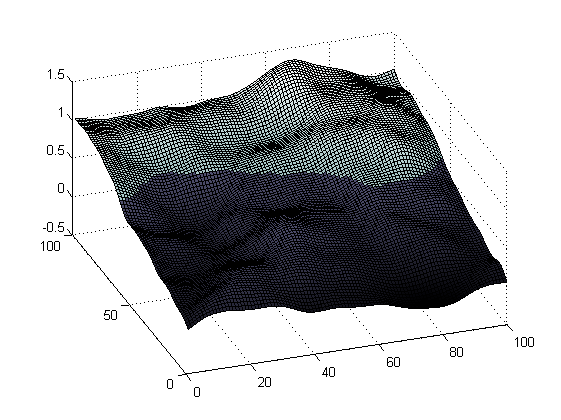
To understand that I've made perlin noise in 2 dimensional space. This is still not what we want, because although this has 3d structure, we do not as yet have an isosurface of zero crossings. But I can use it to illustrate the next point and that is that if I add a ramp in one direction I obtain a border dividing the sheet in an area with positive values from an area with negative values. This is shown in the lower left figure. If this had been a 3d volume the border would not have been a line but would define a surface that can take any form.
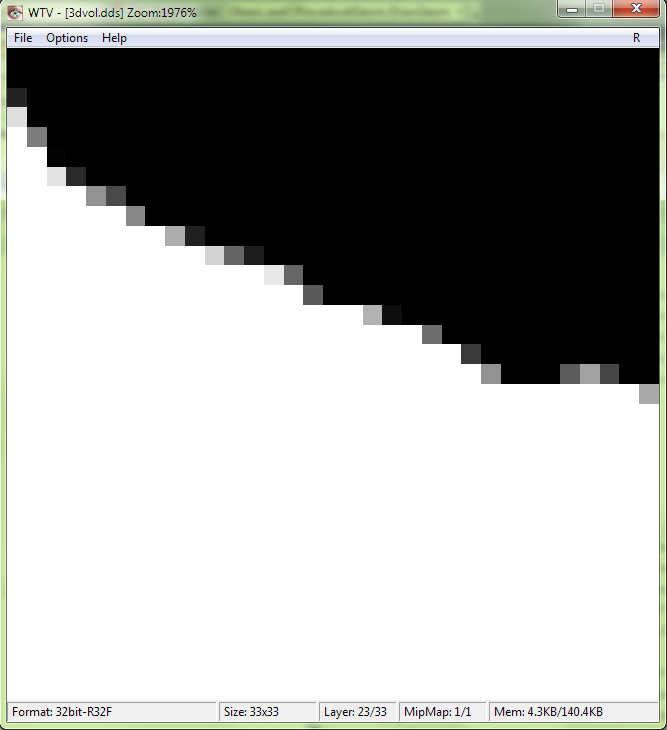
Below a contour is shown from one layer in a 3d texture computed with the shader code shown below. The black pixels are values below zero and the white pixels above one. This has become a density volume texture and will be used in the next steps of the procedure in which I apply the marching cubes algorithm.
//HLSL Shader code to read out random numbers from a random texture volume and make gradual changing density values
Texture3D<float> g_txRandVolume : register( t10 ); //3D noise volume
float sigmoid( float x)
{
return x*x*x*(x*(x*6.0-15.0)+10.0);
}
float derivative( float x)
{
return 30.0*x*x*(x*(x-2.0)+1.0);
}
float secdiv( float x)
{
return 60.0*x*(x*(2.0*x-3.0)+1.0);
}
struct SDens
{
float4 Dens;
float Amb;
};
SDens noise(float3 fOffset, float frq)
{
float x, y, z, o, p, q, u, v, w, du, dv, dw, ddu, ddv, ddw;
SDens D;
float3 vin;
vin = fOffset/ frq;
o = (vin.x%32); //modulus of 32; to find voxel in 3D tex 32 * 32 * 32 in this way the function can be called with any float3 and always lead to a valid coordinate in the texture.
p = (vin.y%32); //makes number between 0 and 32 because the texture has these dimensions
q = (vin.z%32);
//defines corners of voxel with 4 random values
x = floor(o); //round this value to get a round number between 0 and 31
y = floor(p);
z = floor(q); //that corresponds with start point of 8 adjacent pixels forming a cube in a 3D texture
o = o%1; //remainder is coordinates of vector in cube
p = p%1; //vector in random cube, modulus of 1
q = q%1;
u = sigmoid(o); //cubic spline
v = sigmoid(p);
w = sigmoid(q);
du = derivative(o); //derivative, thanks to iñigo quilez 2008
dv = derivative(p);
dw = derivative(q);
ddv = secdiv(p);
ddw = secdiv(q);
//now determine offsets to obtain the 8 random values.
uint4 Offsets[8] =
{
uint4( x, y, z, 0), //a
uint4( x + 1, y, z, 0), //b
uint4( x, y + 1, z, 0), //c
uint4( x + 1, y + 1, z, 0), //d
uint4( x, y, z + 1, 0), //e
uint4( x + 1, y, z + 1, 0), //f
uint4( x, y + 1, z + 1, 0), //g
uint4( x + 1, y + 1, z + 1, 0) //h
};
//get values from the random texture
float dp[8];
for(int i = 0; i < 8; i++){
dp[i] = g_txRandVolume.Load(Offsets[i]);
}
//return linear interpolation in 3d space
float k0 = dp[0];
float k1 = dp[1] - dp[0];
float k2 = dp[2] - dp[0];
float k3 = dp[4] - dp[0];
float k4 = dp[0] - dp[1] - dp[2] + dp[3];
float k5 = dp[0] - dp[2] - dp[4] + dp[6];
float k6 = dp[0] - dp[1] - dp[4] + dp[5];
float k7 = - dp[0] + dp[1] + dp[2] - dp[3] + dp[4] - dp[5] - dp[6] + dp[7];
D.Dens.x = du * (k1 + k4*v + k6*w + k7*v*w); //normal(x, y, z)
D.Dens.y = dv * (k2 + k5*w + k4*u + k7*w*u);
D.Dens.z = dw * (k3 + k6*u + k5*v + k7*u*v);
D.Dens.w = ( k0 + k1*u + k2*v + k3*w + k4*u*v + k5*v*w + k6*w*u + k7*u*v*w ) * frq; //density value
D.Amb = (ddu * (k1 + k4*v + k6*w + k7*v*w) + ddv * (k2 + k5*w + k4*u + k7*w*u) + ddw * (k3 + k6*u + k5*v + k7*u*v))/ 3.0;
return D;
}
static const float Frq[7] = { 128, 64.6, 32.7, 16.5, 8.3, 4.1, 1.9 }; //determines the length of the waves
static const float Scl[7] = { 1.0, 1.0, 1.0, 1.0, 1.0, 1.0, 1.0 }; //scaling of each component
float samplenoise(float3 fOffset) //normal and Amb are not necesssary to make a density volume texture
{
float dens = 0;
SDens D;
float3 ws = fOffset;
for(uint i = 0; i < 7; i++){
D = noise(ws, Frq[i]); //obtain density for each wavelength
dens += D.Dens.w * Scl[i]; //scale
}
dens *= 0.3; //this is just to scale the total magnitude of the noise
dens += fOffset.y - 10; //here I add the ramp to the density values with an arbitray offset
return dens;
}
To make the volume texture you should define a quad and render to a 3d texture using instancing. Use the pixel shader to call the samplenoise function and render the floats to the volume texture. The additional step of the geometry shader is neccessary because a vertexshader cannot define a rendertargetindex. You need this to render to each layer separately in the 3d texture. For this a rendertarget view has been created for the texture (g_pDensVolumeTexRTV).
Directx code;
//Make the volume texture to render the density values
D3D11_TEXTURE3D_DESC dstex;
dstex.Width = 33;
dstex.Height = 33;
dstex.Depth = 33;
dstex.MipLevels = 1;
dstex.Format = DXGI_FORMAT_R32_FLOAT;
dstex.Usage = D3D11_USAGE_DEFAULT;
dstex.BindFlags = D3D11_BIND_SHADER_RESOURCE | D3D11_BIND_RENDER_TARGET;
dstex.CPUAccessFlags = 0;
dstex.MiscFlags = 0;
V_RETURN( pd3dDevice->CreateTexture3D( &dstex, NULL, &g_pDensVolumeTexture ) );
// Create the resource view, so we can sample from the texture at a later stage
D3D11_SHADER_RESOURCE_VIEW_DESC SRVDesc;
ZeroMemory( &SRVDesc, sizeof( SRVDesc ) );
SRVDesc.Format = dstex.Format;
SRVDesc.ViewDimension = D3D11_SRV_DIMENSION_TEXTURE3D;
SRVDesc.Texture3D.MostDetailedMip = 0;
SRVDesc.Texture3D.MipLevels = 1;
V_RETURN( pd3dDevice->CreateShaderResourceView( g_pDensVolumeTexture, &SRVDesc, &g_pDensVolumeTexRV ) );
// Create the render target views, to render the density values to texure memory
D3D11_RENDER_TARGET_VIEW_DESC RTVDesc;
RTVDesc.Format = dstex.Format;
RTVDesc.ViewDimension = D3D11_RTV_DIMENSION_TEXTURE3D;
RTVDesc.Texture3D.MipSlice = 0;
RTVDesc.Texture3D.FirstWSlice = 0;
RTVDesc.Texture3D.WSize = 33;
V_RETURN( pd3dDevice->CreateRenderTargetView( g_pDensVolumeTexture, &RTVDesc, &g_pDensVolumeTexRTV ) );
//create a quad for rendering the texture
QUAD Verts[4]; Verts[0].Pos = XMFLOAT4( -1, -1, 0.5, 1 );
Verts[0].Tex = XMFLOAT2( 0, 1 );
Verts[1].Pos = XMFLOAT4( -1, 1, 0.5, 1 );
Verts[1].Tex = XMFLOAT2( 0, 0 );
Verts[2].Pos = XMFLOAT4( 1, -1, 0.5, 1 );
Verts[2].Tex = XMFLOAT2( 1, 1 );
Verts[3].Pos = XMFLOAT4( 1, 1, 0.5, 1 );
Verts[3].Tex = XMFLOAT2( 1, 0 ); D3D11_BUFFER_DESC bd;
ZeroMemory( &bd, sizeof(bd) );
bd.Usage = D3D11_USAGE_DEFAULT;
bd.ByteWidth = sizeof( QUAD ) * 4;
bd.BindFlags = D3D11_BIND_VERTEX_BUFFER;
bd.CPUAccessFlags = 0;
D3D11_SUBRESOURCE_DATA InitData;
ZeroMemory( &InitData, sizeof(InitData) );
InitData.pSysMem = Verts;
InitData.SysMemPitch = 0;
InitData.SysMemSlicePitch = 0;
V_RETURN( pd3dDevice->CreateBuffer( &bd, &InitData, &g_pQuadVB ) ); // Create index buffer
WORD indices[] =
{
0,1,2,
2,1,3
}; bd.Usage = D3D11_USAGE_DEFAULT;
bd.ByteWidth = sizeof( WORD ) * 6; // 6 vertices needed for 2 triangles in a triangle list
bd.BindFlags = D3D11_BIND_INDEX_BUFFER;
bd.CPUAccessFlags = 0;
InitData.pSysMem = indices;
V_RETURN( pd3dDevice->CreateBuffer( &bd, &InitData, &g_pQuadIB ));
my DirectX function to render the density volume texture
void CProceduralGeom::RenderDensityVolume( ID3D11DeviceContext* pd3dImmediateContext)
{
UINT stride = sizeof( QUAD );
UINT offset = 0;
float ClearColor[4] = { 0.0f,0.0f,0.0f,1.0f };
pd3dImmediateContext->OMSetRenderTargets( 1, &g_pDensVolumeTexRTV, NULL );
pd3dImmediateContext->ClearRenderTargetView( g_pDensVolumeTexRTV, ClearColor ); D3D11_VIEWPORT newViewport;
newViewport.TopLeftX = 0;
newViewport.TopLeftY = 0;
newViewport.Width = float(33); //The texture is going to be 33 pixels wide , high and deep
newViewport.Height = float(33);
newViewport.MinDepth = 0.0f;
newViewport.MaxDepth = 1.0f;
pd3dImmediateContext->RSSetViewports( 1, &newViewport );
pd3dImmediateContext->IASetInputLayout( g_pQuadVertexLayout ); //I think you can imagine what this should look like
pd3dImmediateContext->IASetIndexBuffer( g_pQuadIB, DXGI_FORMAT_R16_UINT, 0 );
pd3dImmediateContext->IASetVertexBuffers( 0, 1, &g_pQuadVB, &stride, &offset );
pd3dImmediateContext->IASetPrimitiveTopology( D3D11_PRIMITIVE_TOPOLOGY_TRIANGLELIST );
//note random volume texture is used by the Pixel shader!!!!
pImmediateContext->PSSetShaderResources( 10, 1, &g_pRandomVolTexRV ); //the texture with random values
pd3dImmediateContext->VSSetShader( g_pVSQuad, NULL, 0 );
pd3dImmediateContext->GSSetShader( g_pGSQuad, NULL, 0 );
pd3dImmediateContext->PSSetShader( g_pPSQuad, NULL, 0 );
pd3dImmediateContext->DrawIndexedInstanced( 6, 33, 0, 0, 0 );
//now the target becomes a resource, but first we have to detach the rendertarget
pd3dImmediateContext->OMSetRenderTargets(0, NULL, NULL );// D3DX11SaveTextureToFile (pd3dImmediateContext, g_pDensVolumeTexture, D3DX11_IFF_DDS, "3dvol.dds");
//if you want to view your density volume texture, this is how to do it.
}
Render the density volume: HLSL code
struct VSDIn
{
float4 pos : POSITION; //position
float2 Tex : TEXCOORD;
uint InstanceID : SV_INSTANCEID;
};struct VSDOut
{
float4 pos : POSITION;
float3 wsCrd : TEXCOORD1;
uint InstanceID : INSTANCEID;
};
struct GSDOut
{
float4 pos : SV_POSITION; //position
float3 wsCrd : TEXCOORD1;
uint RTIndex : SV_RENDERTARGETARRAYINDEX;
};VSDOut VSDens(VSDIn input)
{
VSDOut output = (VSDOut)0;
output.pos = input.pos;
//output.pos.y *= -1; float3 blockCoord = float3( input.Tex.xy * 33, input.InstanceID ); // 0-32 ..> 33
output.wsCrd = Origin.xyz + blockCoord;
output.InstanceID = input.InstanceID; return output;
}
[maxvertexcount (3)]
void GSDens( triangle VSDOut input[3], inout TriangleStream< GSDOut > TriStream )
{
GSDOut outp; for( int v=0; v<3; v++)
{
outp.pos = input[v].pos;
outp.wsCrd = input[v].wsCrd;
outp.RTIndex = input[v].InstanceID;
TriStream.Append(outp);
}
}
float PSDens(GSDOut input) : SV_TARGET
{
return samplenoise( input.wsCrd);
}
Of course you also have to have code that compiles the shaders, and creates the vertex, geometry and pixel shader, in addition to the vertex layout. But this is well documented in the examples included in the Directx documentation.
Part 2. The marching cubes algorithm and defining blocks of geometry.
//create the random numbers
srand( timeGetTime() );
D3D11_SUBRESOURCE_DATA InitData;
InitData.pSysMem = new float[32*32*32];
if( !InitData.pSysMem )
return E_OUTOFMEMORY; InitData.SysMemPitch = 32 * sizeof( float );
InitData.SysMemSlicePitch = 32 * 32 * sizeof( float );
for( int i = 0; i < 32*32*32; i++ )
{
( ( float* )InitData.pSysMem )[i] = float( ( rand() % 10000 ) - 5000 )/5000;
} // Create the texture
D3D11_TEXTURE3D_DESC dstex;
dstex.Width = 32;
dstex.Height = 32;
dstex.Depth = 32;
dstex.MipLevels = 1;
dstex.Format = DXGI_FORMAT_R32_FLOAT;
dstex.Usage = D3D11_USAGE_IMMUTABLE;
dstex.BindFlags = D3D11_BIND_SHADER_RESOURCE;
dstex.CPUAccessFlags = 0;
dstex.MiscFlags = 0;
V_RETURN( pd3dDevice->CreateTexture3D( &dstex, &InitData, &g_pRandomVolumeTexture ) );
SAFE_DELETE_ARRAY( InitData.pSysMem ); // Create a resource view for the 3D volume texture
D3D11_SHADER_RESOURCE_VIEW_DESC SRVDesc;
ZeroMemory( &SRVDesc, sizeof( SRVDesc ) );
SRVDesc.Format = dstex.Format;
SRVDesc.ViewDimension = D3D11_SRV_DIMENSION_TEXTURE3D;
SRVDesc.Texture3D.MostDetailedMip = 0;
SRVDesc.Texture3D.MipLevels = 1;
V_RETURN( pd3dDevice->CreateShaderResourceView( g_pRandomVolumeTexture, &SRVDesc, &g_pRandomVolTexRV ) );